Step-by-Step: How to Convert from Drum Brakes to Disk Brakes for Enhanced Vehicle Performance
Release time:
08 May,2025
Step-by-Step: How to Convert from Drum Brakes to Disk Brakes Converting your vehicle from drum brakes to disk brakes can significantly enhance its braking performance and safety. This comprehensive guide will take you through each step of the process, ensuring you understand the benefits, the necessary tools, and how to execute the conversion efficiently. Let's dive into the intricacies of upgradi

Step-by-Step: How to Convert from Drum Brakes to Disk Brakes
Converting your vehicle from drum brakes to disk brakes can significantly enhance its braking performance and safety. This comprehensive guide will take you through each step of the process, ensuring you understand the benefits, the necessary tools, and how to execute the conversion efficiently. Let's dive into the intricacies of upgrading your braking system.
Table of Contents
- 1. Benefits of Disk Brakes Over Drum Brakes
- 2. Tools and Materials Needed for Conversion
- 3. Understanding the Brake System Components
- 4. Preparation and Safety Measures Before the Conversion
- 5. Step-by-Step Conversion Process
- 6. Common Challenges and How to Avoid Them
- 7. Post-Conversion Tips for Optimal Performance
- 8. FAQs About Drum to Disk Brake Conversion
- 9. Conclusion
1. Benefits of Disk Brakes Over Drum Brakes
Switching from drum brakes to disk brakes provides various advantages that enhance vehicle safety and performance. Here are some key benefits:
1.1 Improved Stopping Power
Disk brakes offer better stopping power due to their design, which allows for more effective heat dissipation. This results in less brake fade during prolonged use, making them ideal for high-performance driving.
1.2 Enhanced Wet Weather Performance
In wet conditions, disk brakes outperform drum brakes. The exposed nature of disk brakes allows water to be expelled more quickly, maintaining effective contact with the brake pads.
1.3 Easier Maintenance
Disk brakes are generally easier to access and maintain than drum brakes. Routine inspections and replacements can be done with less effort, saving time and reducing labor costs.
1.4 Increased Longevity
With proper care, disk brakes can last longer than drum brakes. They experience less wear and tear, provided they are maintained regularly and operated within their limits.
2. Tools and Materials Needed for Conversion
Before starting the conversion process, gather the necessary tools and materials to ensure a smooth workflow. Here’s what you will need:
2.1 Essential Tools
- Jack and jack stands
- Socket set and wrenches
- Pry bar
- Brake bleeder kit
- Torque wrench
- Brake cleaner
- Safety gloves and goggles
2.2 Required Parts
- Disk brake conversion kit (including calipers, rotors, and pads)
- New brake lines (if necessary)
- Brake fluid
- Brake hardware (shims, clips, etc.)
3. Understanding the Brake System Components
To effectively convert your braking system, it's essential to understand the components involved. Here's a breakdown of the critical parts:
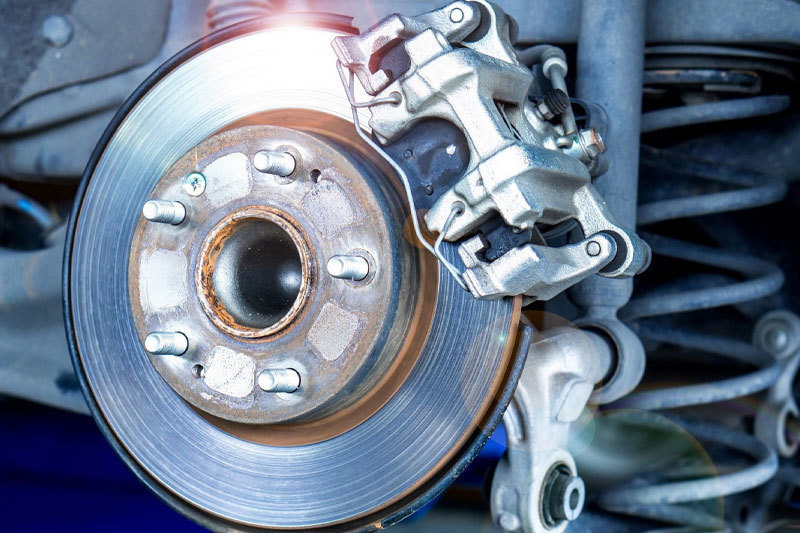
3.1 Brake Rotors
Rotors are the circular discs that the brake pads clamp down on to create friction and stop the vehicle. They are available in various sizes and materials, influencing performance and heat dissipation.
3.2 Calipers
Calipers hold the brake pads and contain the hydraulic mechanism that applies pressure to the pads against the rotors. Choosing the right caliper is crucial for performance and compatibility.
3.3 Brake Pads
Brake pads are friction materials that press against the rotors, generating the necessary friction to slow down or stop the vehicle. Selecting high-quality pads enhances braking efficiency.
3.4 Brake Lines
Brake lines carry hydraulic fluid from the master cylinder to the calipers. Depending on your vehicle's original setup, you may need to replace or modify these lines during the conversion.
4. Preparation and Safety Measures Before the Conversion
Preparation is key to a successful brake system conversion. Follow these safety measures:
4.1 Ensure Proper Vehicle Stabilization
Before starting, ensure the vehicle is parked on a flat surface and securely lifted using jack stands. Never rely solely on a hydraulic jack.
4.2 Wear Safety Gear
Always wear safety gloves and goggles to protect yourself from debris and harmful substances like brake fluid.
4.3 Have a Fire Extinguisher Nearby
In case of an emergency, keep a fire extinguisher close, especially when working with flammable materials like brake fluid.
5. Step-by-Step Conversion Process
This section outlines the detailed steps for converting drum brakes to disk brakes.
5.1 Remove the Existing Drum Brakes
1. **Loosen the lug nuts**: Before lifting the vehicle, loosen the lug nuts on the wheels where you will be removing the drum brakes.
2. **Lift the vehicle**: Use a jack to lift the vehicle and secure it with jack stands.
3. **Remove the wheels**: Take off the wheels to access the drum brakes.
4. **Disassemble the drum brakes**: Remove the drum assembly, including the brake shoes, springs, and hardware. Take note of the order of disassembly for reassembly.
5.2 Install the Disk Brake Components
1. **Mount the new caliper bracket**: Install the caliper bracket as per the instructions included in your conversion kit. Ensure it is secured firmly with the appropriate bolts.
2. **Install the brake rotor**: Slide the brake rotor onto the hub, ensuring it is correctly seated.
3. **Attach the caliper**: Position the caliper over the rotor and secure it according to the manufacturer's instructions.
4. **Install brake pads**: Place the brake pads into the caliper, ensuring they are aligned correctly.
5.3 Connect Brake Lines and Bleed the System
1. **Connect new brake lines**: If your conversion requires new lines, connect them to the caliper and master cylinder.
2. **Bleed the brake system**: Use a brake bleeder kit to remove air from the brake lines. This step is crucial for effective braking performance.
5.4 Reassemble the Wheel Assembly
1. **Reattach the wheel**: Place the wheel back onto the hub and secure it with the lug nuts.
2. **Lower the vehicle**: Carefully lower the vehicle back to the ground and remove the jack stands.
6. Common Challenges and How to Avoid Them
As with any mechanical project, challenges may arise during the conversion process. Here are some common issues and ways to avoid them:
6.1 Incompatible Parts
Ensure that all components in the conversion kit match your vehicle’s specifications. Purchasing parts from reputable suppliers can help avoid compatibility issues.
6.2 Air in the Brake Lines
Air trapped in the brake lines can lead to spongy brakes. Ensure thorough bleeding of the system after installation to eliminate any trapped air.
6.3 Brake Noise Post-Installation
If you experience noise after the conversion, check that all components are correctly installed and that the brake pads are not worn unevenly.
7. Post-Conversion Tips for Optimal Performance
After successfully converting your braking system, consider these tips for optimal performance:
7.1 Break-In Period
Allow for a break-in period for your new brakes. Gradually increase your braking intensity over the first few hundred miles to ensure proper seating of the pads against the rotors.
7.2 Regular Inspections
Regularly inspect your braking system for wear and tear. Look for signs of uneven wear on the brake pads and check the brake fluid level.
7.3 Upgrade Other Components
Consider upgrading other components, such as the master cylinder or brake booster, to complement your new disk brake system and enhance overall performance.
8. FAQs About Drum to Disk Brake Conversion
8.1 How much does it cost to convert from drum brakes to disk brakes?
The conversion cost can vary significantly based on the vehicle model and the quality of parts used. Expect to spend anywhere from $300 to over $1,000.
8.2 Can I convert just the front or rear brakes?
Yes, it is possible to convert either the front or rear brakes. However, for balanced braking performance, it’s advisable to convert both ends.
8.3 Do I need a special license to perform the conversion?
Typically, you do not need a special license; however, it’s essential to have a good understanding of automotive mechanics to perform the conversion safely.
8.4 Will converting to disk brakes improve my vehicle's safety?
Yes, disk brakes generally offer improved stopping power and performance, particularly in adverse weather conditions, thereby enhancing overall safety.
8.5 How often should I check my brake system after conversion?
It's recommended to check your brake system at least once every six months or during routine maintenance for any signs of wear or fluid leaks.
9. Conclusion
Converting from drum brakes to disk brakes is a significant upgrade that can improve your vehicle's performance, safety, and maintenance ease. By following this step-by-step guide, you can confidently undertake this conversion, ensuring that you have the right tools, components, and knowledge to execute the upgrade successfully. With this enhancement, you not only elevate your driving experience but also invest in the longevity and reliability of your vehicle’s braking system.
Tag:
Previous Page
All
- All
- Product Management
- News
- Introduction
- Enterprise outlets
- FAQ
- Enterprise Video
- Enterprise Atlas
RELATED INFORMATION


